If you’re restoring a classic car, swapping panels on a project vehicle, or fixing a rusty fender, you’ve probably run into spot welds. Knowing how to drill out spot welds on a car is a must for any DIY welder, hobbyist, or pro working in a body shop. I’ve spent countless hours in my garage and on job sites wrestling with these stubborn welds, and let me tell you, doing it right saves time, money, and frustration.
Spot welds hold car panels together, but removing them cleanly is critical for repairs, replacements, or custom builds. Mess it up, and you’re looking at damaged panels or weak joints. Let’s walk through the process like we’re in the shop together, so you can tackle this with confidence.

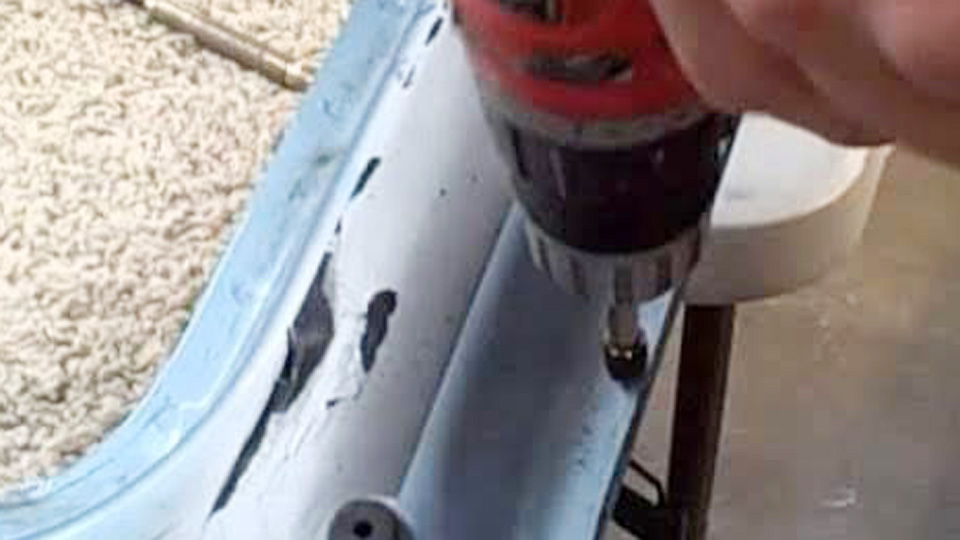
Image by yt/ScottysDetailing
Why Drilling Out Spot Welds Matters
Spot welds are the backbone of car body construction—small, strong welds that join sheet metal without burning through. But when it’s time to separate panels, drilling them out is often the best way to avoid mangling your metal. I’ve seen DIYers hack at spot welds with chisels, only to warp panels and create more work. Drilling ensures clean separation, preserves panel integrity, and sets you up for strong rewelding.
Whether you’re a hobbyist restoring a ’69 Mustang or a pro in an auto shop, mastering this skill keeps your project on track and your welds up to code. Plus, it’s safer than grinding or cutting, which can throw sparks and ruin nearby components.
What Are Spot Welds?
Spot welds are small, circular welds created by resistance welding, where two metal sheets are fused by heat from an electric current. Think of them as metal rivets, typically 3/16 to 1/4 inch in diameter, found on car panels like fenders, hoods, or door skins. They’re strong, efficient, and cheap to produce, which is why automakers love them. But when you need to remove a panel, those welds are your enemy. Drilling them out lets you separate panels without excessive force or damage.
Why Drill Them Out?
Drilling is the go-to method because it’s precise and minimizes collateral damage. You target the weld’s center, remove just enough material to break the bond, and keep the surrounding metal intact. Alternatives like grinding or chiseling can distort the panel or weaken it for rewelding. I’ve tried the chisel method in a pinch—trust me, it’s a headache you don’t need.
Tools You’ll Need to Drill Out Spot Welds
Before we dive into the process, let’s talk gear. Having the right tools makes all the difference. Here’s what I keep in my toolbox for spot weld jobs.
Essential Tools
- Spot Weld Drill Bit: These are specially designed bits (1/8 to 3/8 inch) with a flat tip or center point to stay on the weld. I use a 1/4-inch bit for most car panels.
- Drill: A corded or cordless drill with variable speed. I prefer a cordless DeWalt 20V for mobility in tight spaces like a car’s undercarriage.
- Center Punch: To mark the weld’s center and keep your bit from wandering.
- Safety Gear: Safety glasses, gloves, and a dust mask. Drilling metal throws chips, and you don’t want them in your eyes.
- Pry Tools or Chisel: For gently separating panels after drilling.
- Cutting Fluid: To lubricate the bit and extend its life. WD-40 or a dedicated cutting oil works.
- Shop Vacuum: To clean up metal shavings.
Optional but Helpful
- Spot Weld Cutter: A specialized bit with a pilot tip for cleaner cuts. Worth the investment for frequent jobs.
- Angle Grinder: For cleaning up rough edges post-drilling.
- Welding Gloves: If you’re rewelding later, these double as protection during drilling.
Pro Tip
Invest in a quality spot weld drill bit (like Blair or Lisle brands). Cheap bits dull fast and can tear up the panel. I learned this the hard way on a ’72 Chevy truck restoration—halfway through, my bargain bit started chewing instead of cutting.
Step-by-Step Guide to Drilling Out Spot Welds
Let’s get to the meat of it: how to drill out those spot welds like a pro. Follow these steps, and you’ll be separating panels cleanly in no time. I’ll share some tricks I’ve picked up from years of trial and error.
Step 1: Prep the Work Area
Safety and visibility are key. Clear the area around the weld—remove paint, rust, or undercoating with a wire brush or grinder. I once skipped this on a rusty fender and ended up with a dull bit in ten minutes. Wear your safety glasses and gloves, and set up good lighting. A shop light or headlamp helps you spot the welds, which can blend into the metal.
Step 2: Locate the Spot Welds
Spot welds look like small, circular dimples or slightly raised bumps, often along seams or panel edges. On a car door, check the inner lip or where the skin meets the frame. Use a center punch to mark the exact center of each weld. This keeps your drill bit from slipping. I’ve found that tapping lightly with a hammer works better than pounding hard—too much force can dent thin sheet metal.
Step 3: Choose the Right Drill Bit
Pick a spot weld drill bit that matches the weld size (usually 1/4 inch for most cars). If you’re using a standard twist bit, go slightly larger than the weld’s diameter to ensure you remove enough material. For a 1/4-inch weld, a 5/16-inch bit works well. Apply a dab of cutting fluid to the bit to reduce heat and wear.
Step 4: Set Up Your Drill
Use a variable-speed drill and set it to a low-to-medium speed (500-1000 RPM). High speeds generate too much heat, dulling the bit and potentially warping the metal. I’ve burned through bits by cranking the speed too high—slow and steady wins here. If your drill has a clutch, set it to a low torque to avoid stripping the weld.
Step 5: Drill the Weld
Position the bit on the center punch mark and start drilling with light pressure. Let the bit do the work—don’t force it. Drill until you feel a slight give, which means you’ve cut through the weld’s bond. Stop before you punch through both panels; you want to preserve the base panel for rewelding. On a typical car panel (16-20 gauge steel), this takes about 1/16 to 1/8 inch of depth. Check your progress often to avoid over-drilling.
Step 6: Separate the Panels
Once all welds are drilled, use a pry bar or flathead screwdriver to gently separate the panels. If they’re stuck, double-check for missed welds or adhesive. I’ve had to go back and drill a hidden weld or two on older cars where seam sealer hid the spots. Be patient—forcing it can bend the metal.
Step 7: Clean Up
Remove metal shavings with a shop vacuum or brush. If you’re rewelding, grind down any rough edges with an angle grinder and clean the area with acetone to ensure a strong weld. I’ve seen rewelds fail because of leftover debris—don’t skip this step.
Common Mistakes and Fixes
- Mistake: Drilling too deep and damaging the base panel. Fix: Use a depth stop or mark your bit with tape to limit penetration.
- Mistake: Bit wandering off-center. Fix: Always use a center punch and start with a smaller pilot hole if needed.
- Mistake: Overheating the bit. Fix: Apply cutting fluid and pause every 10-15 seconds to let the bit cool.
Rewelding After Drilling: Tips for Success
Once you’ve drilled out the spot welds and separated the panels, you’ll likely need to reweld a new panel in place. Here’s how to set yourself up for strong, clean welds that match the original spot welds.
Welding Process
For car panels, MIG welding with a spot or plug weld setup is ideal. It mimics the factory resistance welds and works well on thin sheet metal. Use a MIG welder like a Lincoln Electric or Miller with a 0.030-inch ER70S-6 wire for mild steel panels. If you’re working on aluminum (like some modern car hoods), switch to a TIG welder with ER4043 filler and argon shielding gas.
Machine Settings
- MIG on Steel: Set your welder to 16-18 volts and 80-120 amps for 18-gauge steel. Use a short arc length and a 15-degree push angle. Weld in short bursts (1-2 seconds) to avoid burn-through.
- TIG on Aluminum: Set to 100-150 amps, AC mode, with a 15-20 CFH argon flow. Use a 1/16-inch tungsten and match the filler rod diameter to the panel thickness.
Joint Prep
Before welding, ensure the new panel fits snugly. Grind the drilled areas to remove burrs and clean with acetone. For plug welds, drill 1/4-inch holes in the new panel where the spot welds were, aligning them with the base panel. Clamp the panels tightly to avoid gaps. I’ve had to redo welds because of poor fit-up—take the time to get it right.
Filler Compatibility
Match your filler to the base metal. For mild steel, ER70S-6 wire is versatile and strong. For galvanized steel, use a low-silicon wire to reduce spatter. On aluminum, ER4043 is forgiving and flows well. Mismatched fillers can lead to weak welds or cracking, so double-check your material.
Safety Considerations
Drilling and welding aren’t without risks. Here’s how to stay safe in the shop.
- Drilling: Wear safety glasses and gloves to protect against metal chips. Keep a fire extinguisher nearby—cutting fluid can ignite if you’re sloppy. Work in a well-ventilated area to avoid inhaling dust.
- Welding: Use a welding helmet (auto-darkening, shade 10-12 for MIG), welding gloves, and a flame-resistant jacket. Ensure proper ventilation to avoid fume inhalation. I once got a nasty headache from welding in a cramped garage—open the doors or use a fume extractor.
- Electrical Safety: Check your drill and welder for frayed cords. Ground your welder properly to avoid shocks, especially on damp shop floors.
Pros and Cons of Drilling Out Spot Welds
| Pros | Cons |
|---|---|
| Precise, clean panel separation | Requires specialized bits for best results |
| Preserves base panel for rewelding | Can be time-consuming for many welds |
| Minimal distortion compared to grinding | Risk of over-drilling if not careful |
| Accessible for DIYers with basic tools | Creates metal shavings that need cleanup |
Real-World Applications
Whether you’re a student learning auto body repair, a hobbyist restoring a vintage ride, or a pro in a collision shop, drilling spot welds has real-world uses.
DIY Car Restoration
You’re bringing a ’65 Pontiac GTO back to life. The quarter panel is rusted, so you need to replace it. Drilling out the spot welds along the seams lets you remove the old panel without warping the frame. Use a spot weld cutter for clean holes, then MIG weld the new panel with plug welds. I’ve done this on a ’73 Camaro—patience and prep made all the difference.
Professional Auto Body Repair
In a shop, you’re fixing a wrecked Ford F-150 fender. The customer wants it done fast, but the fender’s spot-welded to the frame. UT confirms the welds are sound, so you drill them out with a 1/4-inch bit, replace the fender, and reweld with a MIG. Speed and precision keep the job profitable and the customer happy.
Custom Fabrication
You’re building a custom hot rod with a chopped top. Drilling out the roof’s spot welds lets you remove it cleanly for modification. After reshaping, you reweld with TIG for a seamless look. I helped a buddy with a similar project—clean drilling kept the body lines crisp.
Conclusion
You’re now ready to tackle how to drill out spot welds on a car like a seasoned welder. From prepping your work area to choosing the right bit and rewelding cleanly, you’ve got the know-how to separate panels without damage and set up strong joints. This skill saves time, preserves your car’s integrity, and ensures your repairs or custom builds meet professional standards. Whether you’re a DIYer, hobbyist, or pro, you can approach your next project with confidence.
Always mark your drill bit with tape to control depth—it’s a simple trick that prevents over-drilling and saves your base panel.
FAQ
What’s the best drill bit for spot welds on a car?
A spot weld drill bit (like Blair or Lisle, 1/4 inch) is best because it’s designed to cut through welds without wandering. Standard twist bits work but require more care. Use cutting fluid to extend bit life.
Can I drill out spot welds without a spot weld cutter?
Yes, a standard twist bit (5/16 inch for 1/4-inch welds) works if you’re careful. Center punch the weld first to prevent slipping. A spot weld cutter is faster and cleaner but not mandatory for occasional jobs.
How do I avoid damaging the base panel when drilling?
Use a depth stop or tape your bit to limit penetration to 1/16-1/8 inch. Drill slowly and check progress often. Stop when you feel the weld give to preserve the base panel for rewelding.
What welding process is best for replacing spot welds?
MIG welding with plug welds is ideal for steel car panels (0.030-inch ER70S-6 wire, 16-18 volts). For aluminum, use TIG with ER4043 filler. Ensure tight fit-up and clean surfaces for strong welds.
How do I find all the spot welds on a car panel?
Look for circular dimples or bumps along seams, often 1-2 inches apart. Scrape off paint or undercoating with a wire brush to reveal them. Good lighting and a center punch help mark each one accurately.

I’m Darrell Julian, the founder, lead writer, and hands-on welding enthusiast behind ArcWeldingPro.com. With more than 15 years of real-world welding experience, I created this platform to share what I’ve learned in the field, in the shop, and in the heat of the arc.


