In the world of welding, understanding the concept of duty cycle is crucial for both safety and efficiency. The duty cycle is a key specification of welding machines that indicates how long a welder can operate continuously before it needs to cool down. This guide will explore the duty cycle in depth, provide formulas for calculation, and introduce you to duty cycle calculators.
Welding Duty Cycle Formula
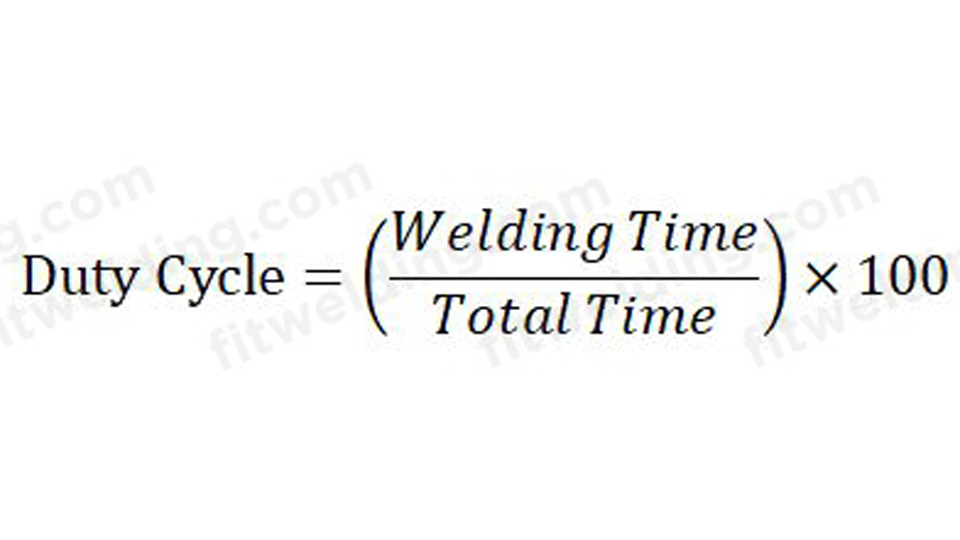
The basic formula for calculating the duty cycle is:
Duty Cycle = (Welding Time / Total Cycle Time) ? 100
Where:
- Welding Time is the duration of continuous welding
- Total Cycle Time is typically 10 minutes
Example Calculation
Let’s say you can weld continuously for 4 minutes before the machine needs to cool down. Here’s how you would calculate the duty cycle:
Duty Cycle = (4 minutes / 10 minutes) ? 100 = 40%
This means your welding machine has a 40% duty cycle at the amperage you’re using.

What is Welding Duty Cycle?
The welding duty cycle is defined as the percentage of time a welding machine can operate continuously within a 10-minute period without overheating. It’s typically expressed as a percentage at a specific amperage rating.
As example, if a welding machine has a duty cycle of 60% at 300 amperes, it means the machine can weld continuously for 6 minutes out of a 10-minute period at 300 amperes before it needs to cool down for the remaining 4 minutes.
Importance of Duty Cycle
Understanding and adhering to the duty cycle is crucial for several reasons:
- Equipment Protection: It prevents overheating and potential damage to the welding machine.
- Weld Quality: Consistent welding within the duty cycle ensures uniform weld quality.
- Productivity: It helps in planning welding tasks efficiently, especially for large projects.
- Safety: Overheating can lead to safety hazards in the workplace.
Advanced Duty Cycle Calculations
While the basic formula is straightforward, there are more complex calculations that take into account varying amperages and duty cycles.
Calculating Duty Cycle at Different Amperages
The duty cycle changes with amperage. Generally, as amperage increases, the duty cycle decreases. To calculate the duty cycle at a different amperage, you can use this formula:
(Amperage1 / Amperage2)? = (Duty Cycle2 / Duty Cycle1)
Where:
- Amperage1 and Duty Cycle1 are the known values
- Amperage2 is the new amperage you want to use
- Duty Cycle2 is the duty cycle at the new amperage
Example of Amperage-Based Calculation
Let’s say your welder has a 60% duty cycle at 300 amperes, and you want to know the duty cycle at 250 amperes:
(300 / 250)? = (X / 60) 1.44 = (X / 60) X = 1.44 ? 60 = 86.4%
So, at 250 amperes, your duty cycle would be approximately 86.4%.
Welding Duty Cycle Calculator
While manual calculations are useful, welding duty cycle calculators can simplify the process, especially for complex scenarios. These calculators typically allow you to input various parameters and quickly determine the duty cycle or safe operating time.
How to Use a Duty Cycle Calculator
Most duty cycle calculators require the following inputs:
- Rated Amperage: The amperage at which the duty cycle is rated
- Rated Duty Cycle: The duty cycle percentage at the rated amperage
- Desired Amperage: The amperage at which you want to weld
The calculator then provides:
- The duty cycle at your desired amperage
- The continuous welding time allowed in a 10-minute cycle
Benefits of Using a Calculator
- Accuracy: Reduces the chance of calculation errors
- Time-saving: Quickly determine duty cycles for various scenarios
- Optimization: Helps in finding the optimal balance between amperage and duty cycle for your project
Factors Affecting Duty Cycle
Several factors can influence a welding machine’s duty cycle:
Amperage Setting
As mentioned earlier, higher amperages generally result in lower duty cycles due to increased heat generation.
Ambient Temperature
Welding in hot environments can reduce the effective duty cycle of your machine. Cooler environments allow for more efficient heat dissipation.
Machine Design and Cooling System
Higher-quality welding machines often have more efficient cooling systems, allowing for longer duty cycles.
Power Source
The type of power source (e.g., transformer-based vs. inverter-based) can affect the duty cycle. Modern inverter welding machines often have higher duty cycles due to their efficient design.
Practical Applications of Duty Cycle Calculations
Understanding how to calculate and use duty cycle information has several practical applications in welding:
Project Planning
By knowing your machine’s duty cycle at various amperages, you can plan your welding tasks more efficiently. This is particularly important for large projects where continuous welding is required.
Equipment Selection
When purchasing or renting welding equipment, you can use duty cycle calculations to ensure you select a machine that meets your specific needs.
Optimizing Welding Parameters
By understanding the relationship between amperage and duty cycle, you can optimize your welding parameters for the best balance of productivity and equipment longevity.
Troubleshooting
If you’re experiencing issues with your welding machine, duty cycle calculations can help determine if you’re operating within the machine’s capabilities.
Common Misconceptions About Duty Cycle
There are several misconceptions about duty cycle that are worth addressing:
1. “Higher Duty Cycle Always Means Better Quality”
While a higher duty cycle can be beneficial, it doesn’t necessarily translate to better weld quality. The appropriate duty cycle depends on your specific welding needs.
2. “Duty Cycle Only Matters for Industrial Welding”
Even for hobbyist or occasional welders, understanding duty cycle is important for equipment longevity and safety.
3. “You Can Ignore Duty Cycle for Short Welds”
Even if you’re not welding continuously for long periods, adhering to the duty cycle helps prevent cumulative heat buildup in your machine.
Tips for Managing Duty Cycle in Practice
Here are some practical tips for managing duty cycle in your welding projects:
- Use a timer to track your welding and rest periods.
- Alternate between different welding tasks to allow for cooling periods.
- In hot environments, provide additional cooling for your welding machine.
- For large projects, consider using multiple welding machines to maintain continuous operation while adhering to duty cycle limitations.
Conclusion
Understanding welding duty cycle, how to calculate it, and how to use calculators for quick determinations is essential for any welder, whether you’re a hobbyist or a professional. By mastering these concepts, you can ensure the longevity of your equipment, maintain high weld quality, and optimize your welding processes for maximum efficiency and safety.
While calculators and formulas are valuable tools, they should be used in conjunction with the manufacturer’s specifications and your own experience. Always prioritize safety and equipment care in your welding practices.
As welding technology continues to advance, staying informed about concepts like duty cycle will help you adapt to new equipment and techniques, ensuring you remain at the forefront of efficient and effective welding practices.

I’m Darrell Julian, the founder, lead writer, and hands-on welding enthusiast behind ArcWeldingPro.com. With more than 15 years of real-world welding experience, I created this platform to share what I’ve learned in the field, in the shop, and in the heat of the arc.


